Uploading Files to Amazon S3 With a Rails API Backend and Javascript Frontend
This guide will walk you through a method to integrate S3 hosting with Rails-as-an-API. I will also talk about how to integrate with the frontend. Note while some of the setup is focused on Heroku, this is applicable for any Rails API backend. There are many short guides out there, but this is intended to bring everything together in a clear manner. I put troubleshooting tips at the end, for some of the errors I ran into.
For this guide, I had a Rails API app in one working directory, and a React app in a different directory. I will assume you already know the basics of connecting your frontend to your backend, and assume that you know how to run them locally. This guide is quite long, and may take you a few hours to follow along with. Please take breaks.
Background
We will be uploading the file straight from the frontend. One advantage of this is that it saves us on large requests. If we uploaded to the backend, then had the backend send it to S3, that will be two instances of a potentially large request. Another advantage is because of Heroku’s setup: Heroku has an “ephemeral filesystem.” Your files may remain on the system briefly, but they will always disappear on a system cycle. You can try to upload files to Heroku then immediately upload them to S3. However, if the filesystem cycles in that time, you will upload an incomplete file. This is less relevant for smaller files, but we will play it safe for the purposes of this guide.
Our backend will serve two roles: it will save metadata about the file, and handle all of the authentication steps that S3 requires. It will never touch the actual files.
The flow will look like this:
- The frontend sends a request to the Rails server for an authorized url to upload to.
- The server (using Active Storage) creates an authorized url for S3, then passes that back to the frontend.
- The frontend uploads the file to S3 using the authorized url.
- The frontend confirms the upload, and makes a request to the backend to create an object that tracks the needed metadata.
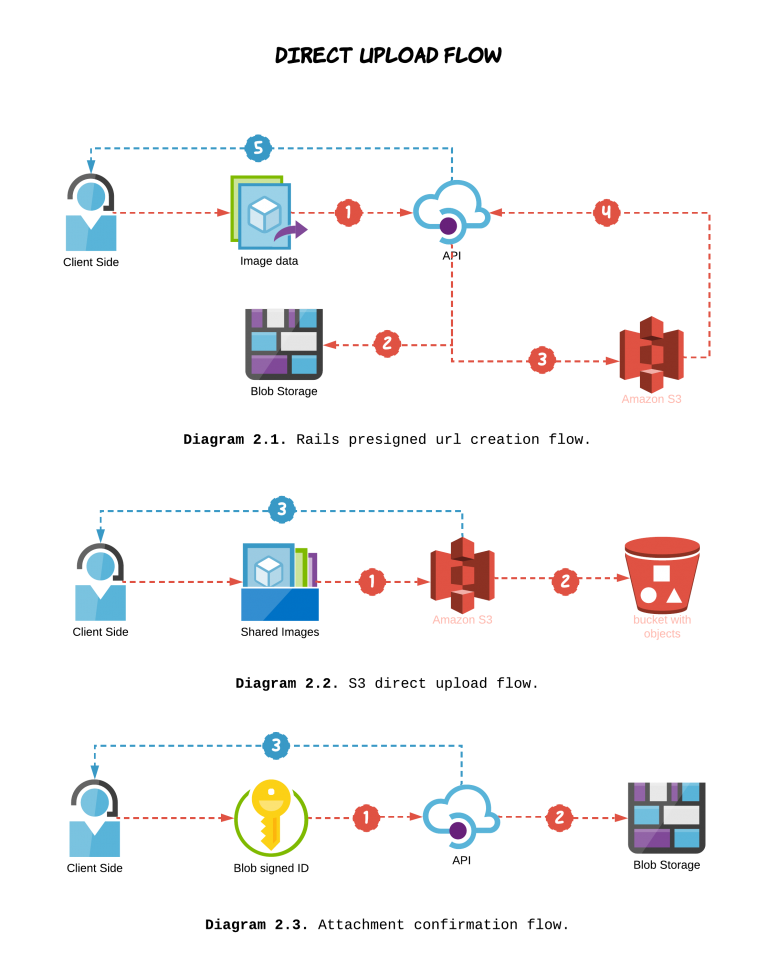 |
| Steps 1 and 2 are in diagram 2.1. Steps 3 and 4 are diagrams 2.2 and 2.3, respectively. |
| Image taken from Applaudo Studios |
Setting up S3
First, we will set up the S3 resources we want. Create two S3 buckets, prod and dev. You can let everything be default, but take note of the bucket region. You will need that later.
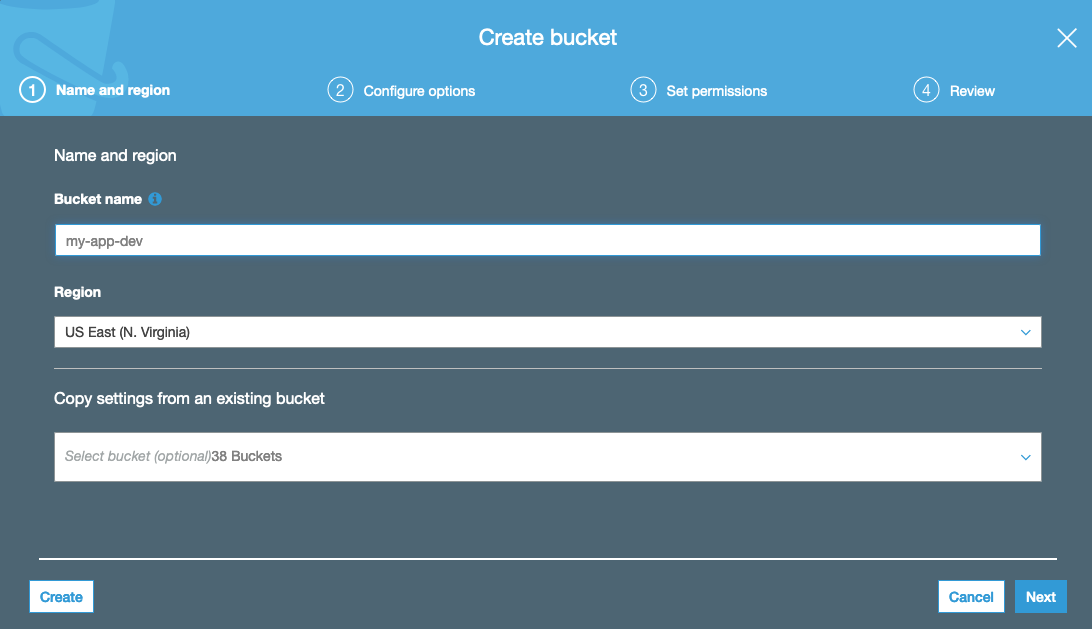 |
| What you see in S3 when making a new bucket. |
Next, we will set up Cross-Origin Resource Sharing (CORS). This will allow you to make POST & PUT requests to your bucket. Go into each bucket, Permissions -> CORS Configuration. For now, we will just use a default config that allows everything. We will restrict it later.
<?xml version="1.0" encoding="UTF-8"?>
<CORSConfiguration xmlns="http://s3.amazonaws.com/doc/2006-03-01/">
<CORSRule>
    <AllowedOrigin>*</AllowedOrigin>
    <AllowedMethod>GET</AllowedMethod>
    <AllowedMethod>POST</AllowedMethod>
    <AllowedMethod>PUT</AllowedMethod>
    <AllowedHeader>*</AllowedHeader>
</CORSRule>
</CORSConfiguration>
Next, we will create some security credentials to allow our backend to do fancy things with our bucket. Click the dropdown with your account name, and select My Security Credentials. This will take you to AWS IAM.
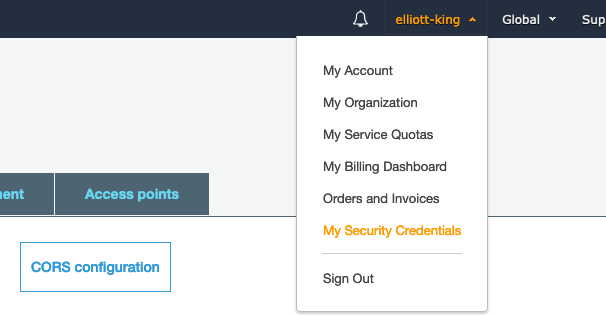 |
| Accessing “My Security Credentials” |
Once in the Identity and Access Management console, you should go to the access keys section, and create a new access key.
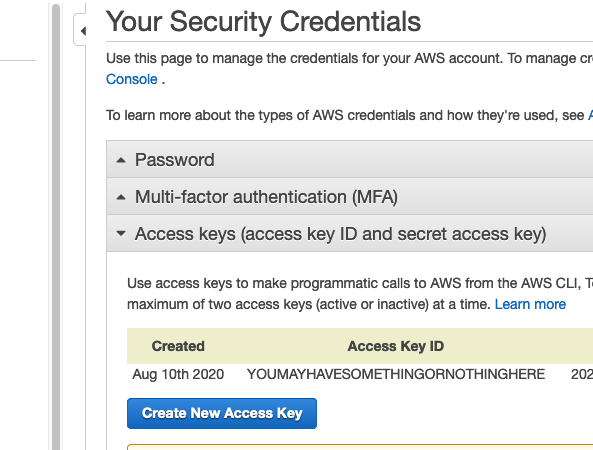 |
| Location of AWS access keys |
Here, it will create a key for you. It will never show you the secret again, so make sure you save these values in a file on your computer.
Rails API Backend
Again, I assume you know how to create a basic Rails API. I will be attaching my file to a user model, but you can attach it to whatever you want.
Environment Variables
Add two gems to your Gemfile: gem 'aws-sdk-s3' and gem 'dotenv-rails', then bundle install. The first gem is the S3 software development kit. The second gem allows Rails to use a .env file.
The access key and region (from AWS) are needed within Rails. While locally developing, we will pass these values using a .env file. While on Heroku, we can set the values using heroku config, which we will explore at the end of this guide. We will not be using a Procfile. Create the .env file at the root of your directory, and be sure to add it to your gitignore. You don’t want your AWS account secrets ending up on Github. Your .env file should include:
AWS_ACCESS_KEY_ID=YOURACCESSKEY
AWS_SECRET_ACCESS_KEY=sEcReTkEyInSpoNGeBoBCaSe
S3_BUCKET=your-app-dev
AWS_REGION=your-region-1
Storage Setup
Run rails active_storage:install. Active Storage is a library that helps with uploads to various cloud storages. Running this command will create a migration for a table that will handle the files’ metadata. Make sure to rails db:migrate.
Next, we will modify the files that keep track of the Active Storage environment. There should be a config/storage.yml file. We will add an amazon S3 storage option. Its values come from our .env file.
amazon:
  service: S3
  access_key_id: <%= ENV['AWS_ACCESS_KEY_ID'] %>
  secret_access_key: <%= ENV['AWS_SECRET_ACCESS_KEY'] %>
  region: <%= ENV['AWS_REGION'] %>
  bucket: <%= ENV['S3_BUCKET'] %>
Next, go to config/enviroments, and update your production.rb and development.rb. For both of these, change the Active Storage service to your newly added one:
config.active_storage.service = :amazon
Finally, we need an initializer for the AWS S3 service, to set it up with the access key. Create a config/initializers/aws.rb, and insert the following code:
require 'aws-sdk-s3'

Aws.config.update({
  region: ENV['AWS_REGION'],
  credentials: Aws::Credentials.new(ENV['AWS_ACCESS_KEY_ID'], ENV['AWS_SECRET_ACCESS_KEY']),
})

S3_BUCKET = Aws::S3::Resource.new.bucket(ENV['S3_BUCKET'])
We are now ready to store files. Next we will talk about the Rails model and controller setup.
Model
For my app, I am uploading user resumes, for the user model. You may be uploading images or other files. Feel free to change the variable names to whatever you like.
In my user.rb model file, we need to attach the file to the model. We will also create a helper method that shares the file’s public URL, which will become relevant later.
class User < ApplicationRecord
  has_one_attached :resume

  def resume_url
    if resume.attached?
      resume.blob.service_url
    end
  end
end
Make sure that the model does not have a corresponding column in its table. There should be no resume column in my user’s schema.
Direct Upload Controller
Next we will create a controller to handle the authentication with S3 through Active Storage. This controller will expect a POST request, and will return an object that includes a signed url for the frontend to PUT to. Run rails g controller direct_upload to create this file. Additionally, add a route to routes.rb:
post '/presigned_url', to: 'direct_upload#create'
The contents of the direct_upload_controller.rb file can be found here.
The actual magic is handled by the ActiveStorage::Blob.create_before_direct_upload! function. Everything else just formats the input or output a little bit. Take a look at blob_params; our frontend will be responsible for determining those.
Testing
At this point, it might be useful to verify that the endpoint is working. You can test this functionality with something like curl or Postman. I used Postman.
Run your local server with rails s, then you can test your direct_upload#create endpoint by sending a POST request. There are a few things you will need:
- On a Unix machine, you can get the size of a file using
ls -l. - If you have a different type of file, make sure to change the
content_typevalue. - S3 also expects a “checksum”, so that it can verify that it received an uncorrupted file. This should be the MD5 hash of the file, encoded in base64. You can get this by running
openssl md5 -binary filename | base64.
Your POST request to /presigned_url might look like this:
{
    "file": {
        "filename": "test_upload",
        "byte_size": 67969,
        "checksum": "VtVrTvbyW7L2DOsRBsh0UQ==",
        "content_type": "application/pdf",
        "metadata": {
            "message": "active_storage_test"
        }
    }
}
The response should have a pre-signed URL and an id:
{
    "direct_upload": {
        "url": "https://your-s3-bucket-dev.s3.amazonaws.com/uploads/uuid?some-really-long-parameters",
        "headers": {
            "Content-Type": "application/pdf",
            "Content-MD5": "VtVrTvbyW7L2DOsRBsh0UQ=="
        }
    },
    "blob_signed_id": "eyJfcmFpbHMiOnsibWVzc2FnZSI6IkJBaHBSQT09IiwiZXhwIjpudWxsLCJwdXIiOiJibG9iX2lkIn19--8a8b5467554825da176aa8bca80cc46c75459131"
}
The response direct_upload.url should have several parameters attached to it. Don’t worry too much about it; if there was something wrong you would just get an error.
| X-Amz-Algorithm |
| X-Amz-Credential |
| X-Amz-Date |
| X-Amz-Expires |
| X-Amz-SignedHeaders |
| X-Amz-Signature |
Your direct upload now has an expiration of 10 minutes. If this looks correct, we can use the direct_upload object to make a PUT request to S3. Use the same url, and make sure you include the headers. The body of the request will be the file you are looking to include.
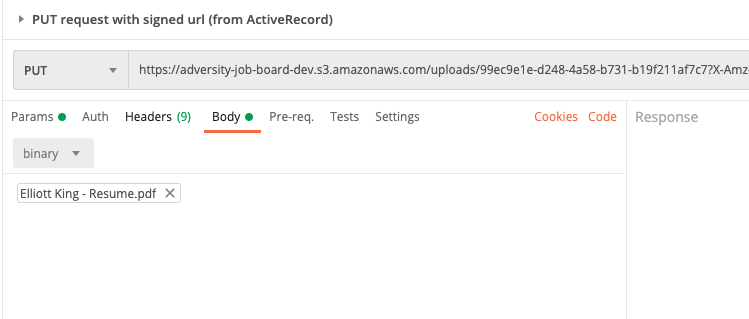 |
| What the PUT looks like in Postman. Headers not shown. |
You should get a simple empty response with a code of 200. If you go to the S3 bucket in the AWS console, you should see the folder and the file. Note that you can’t actually view the file (you can only view its metadata). If you try to click the “Object URL”, it will tell you Access Denied. This is okay! We don’t have permission to read the file. Earlier, in my user.rb model, I put a helper function that uses Active Storage to get a public URL. We will take a look at that in a bit.
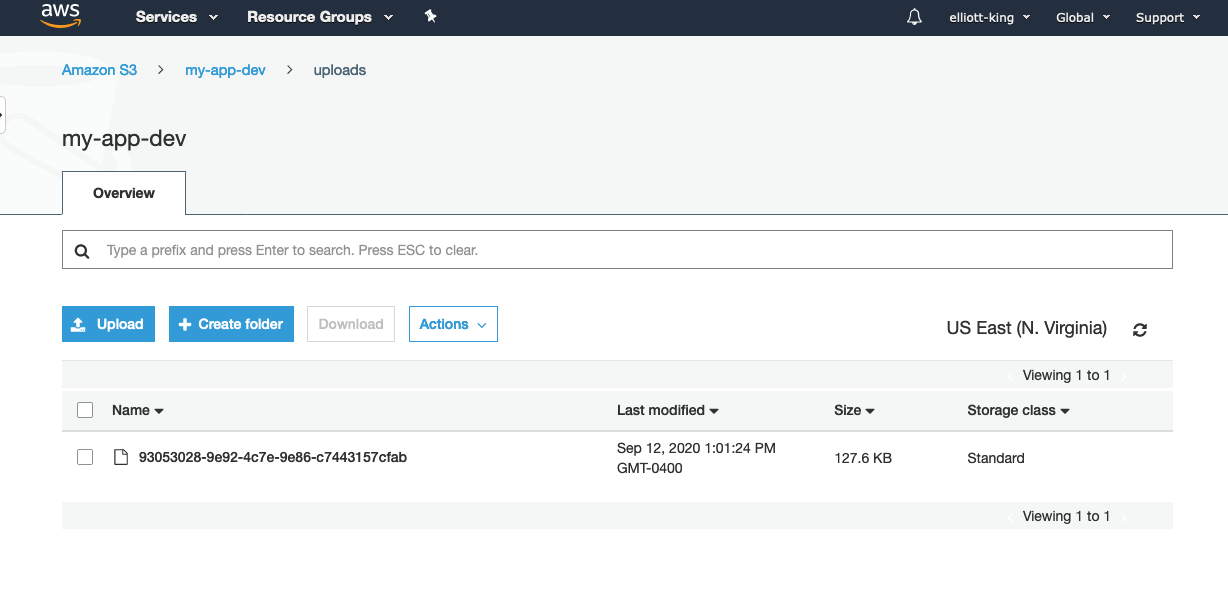 |
| The uploaded file |
User Controller
If you recall our flow:
- The frontend sends a request to the server for an authorized url to upload to.
The server (using Active Storage) creates an authorized url for S3, then passes that back to the frontend.Done.- The frontend uploads the file to S3 using the authorized url.
- The frontend confirms the upload, and makes a request to the backend to create an object that tracks the needed metadata.
The backend still needs one bit of functionality. It needs to be able to create a new record using the uploaded file. For example, I am using resume files, and attaching them to users. For a new user creation, it expects a first_name, last_name, and email. The resume will take the form of signed_blob_id we saw earlier. Active Storage only needs this ID to connect the file to your model instance. Here is what my users_controller#create looks like, and I also made a gist:
def create
   resume = params[:pdf]
   params = user_params.except(:pdf)
   user = User.create!(params)
   user.resume.attach(resume) if resume.present? && !!user
   render json: user.as_json(root: false, methods: :resume_url).except('updated_at')
end

private
def user_params
   params.permit(:email, :first_name, :last_name, :pdf)
end
The biggest new thing is the resume.attach call. Also note that we are returning the json of the user, and including our created resume_url method. This is what allows us to view the resume.
Your params may look different if your model is different. We can again test this with Postman or curl. Here is a json POST request that I would make to the /users endpoint:
{
    "email": "test08@email1.com",
    "first_name": "Test",
    "last_name": "er",
    "pdf": "eyJfcmFpbHMiOnsibWVzc2FnZSI6IkJBaHBLdz09IiwiZXhwIjpudWxsLCJwdXIiOiJibG9iX2lkIn19--3fe2ec7e27bb9b5678dd9f4c7786032897d9511b"
}
This is much like a normal user creation, except we call attach on the file ID that is passed with the request. The ID is from the response of our first request, the blob_signed_id field. You should get a response that represents the user, but has a resume_url field. You can follow this public url to see your uploaded file! This url comes from the blob.service_url we included in the user.rb model.
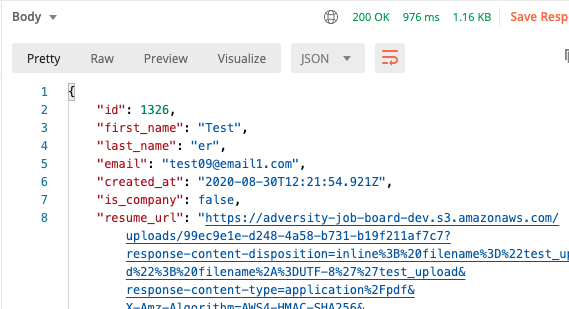 |
| The response, containing the newly created user. |
If this is all working, your backend is probably all set.
The Javascript Frontend
Remember our overall request flow. If we only consider the requests that the frontend performs, it will look like this:
- Make POST request for signed url.
- Make PUT request to S3 to upload the file.
- Make POST to
/usersto create new user.
We have already tested all of this using curl/Postman. Now it just needs to be implemented on the frontend. I am also going to assume you know how to get a file into Javascript from a computer. <input> is the simplest method, but there are plenty of guides out there.
The only difficult part of this is calculating the checksum of the file. This is a little weird to follow, and I had to guess-and-check my way through a bit of this. To start with, we will npm install crypto-js. Crypto JS is a cryptographic library for Javascript.
Note: if you are using vanilla Javascript and can’t use npm, here are some directions to import it with a CDN. You will need:
rollups/md5.jscomponents/lib-typedarrays-min.jscomponents/enc-base64-min.js
Then, we will read the file with FileReader before hashing it, according to the following code. Here is a link to the corresponding gist.
import CryptoJS from 'crypto-js'

// Note that for larger files, you may want to hash them incrementally.
// Taken from https://stackoverflow.com/questions/768268/
const md5FromFile = (file) => {
  // FileReader is event driven, does not return promise
  // Wrap with promise api so we can call w/ async await
  // https://stackoverflow.com/questions/34495796
  return new Promise((resolve, reject) => {
    const reader = new FileReader()

    reader.onload = (fileEvent) => {
      let binary = CryptoJS.lib.WordArray.create(fileEvent.target.result)
      const md5 = CryptoJS.MD5(binary)
      resolve(md5)
    }
    reader.onerror = () => {
      reject('oops, something went wrong with the file reader.')
    }
    // For some reason, readAsBinaryString(file) does not work correctly,
    // so we will handle it as a word array
    reader.readAsArrayBuffer(file)
  })
}

export const fileChecksum = async(file) => {
  const md5 = await md5FromFile(file)
  const checksum = md5.toString(CryptoJS.enc.Base64)
  return checksum
}
At the end of this, we will have an MD5 hash, encoded in base64 (just like we did above with the terminal). We are almost done! The only thing we need are the actual requests. I will paste the code, but here is a link to a gist of the JS request code.
import { fileChecksum } from 'utils/checksum'

const createPresignedUrl = async(file, byte_size, checksum) => {
  let options = {
    method: 'POST',
    headers: {
      'Accept': 'application/json',
      'Content-Type': 'application/json',
    },
    body: JSON.stringify({
      file: {
        filename: file.name,
        byte_size: byte_size,
        checksum: checksum,
        content_type: 'application/pdf',
        metadata: {
          'message': 'resume for parsing'
        }
      }
    })
  }
  let res = await fetch(PRESIGNED_URL_API_ENDPOINT, options)
  if (res.status !== 200) return res
  return await res.json()
}

export const createUser = async(userInfo) => {
  const {pdf, email, first_name, last_name} = userInfo

  // To upload pdf file to S3, we need to do three steps:
  // 1) request a pre-signed PUT request (for S3) from the backend

  const checksum = await fileChecksum(pdf)
  const presignedFileParams = await createPresignedUrl(pdf, pdf.size, checksum)

  // 2) send file to said PUT request (to S3)
  const s3PutOptions = {
    method: 'PUT',
    headers: presignedFileParams.direct_upload.headers,
    body: pdf,
  }
  let awsRes = await fetch(presignedFileParams.direct_upload.url, s3PutOptions)
  if (awsRes.status !== 200) return awsRes

  // 3) confirm & create user with backend
  let usersPostOptions = {
    method: 'POST',
    headers: {
      'Accept': 'application/json',
      'Content-Type': 'application/json'
    },
    body: JSON.stringify({
      email: email,
      first_name: first_name,
      last_name: last_name,
      pdf: presignedFileParams.blob_signed_id,
    })
  }
  let res = await fetch(USERS_API_ENDPOINT, usersPostOptions)
  if (res.status !== 200) return res
  return await res.json()
}
Note that you need to provide the two global variables: USERS_API_ENDPOINT and PRESIGNED_URL_API_ENDPOINT. Also note that the pdf variable is a Javascript file object. Again, if you are not uploading pdfs, be sure to change the appropriate content_type.
You now have the required Javascript to make your application work. Just attach the createUser method to form inputs, and make sure that pdf is a file object. If you open the Network tab in your browser devtools, you should see three requests made when you call the method: one to your API’s presigned_url endpoint, one to S3, and one to your API’s user create endpoint. The final one will also return a public URL for the file, so you can view it for a limited time.
Final Steps and Cleanup
S3 Buckets
Make sure your prod app is using a different bucket from your development. This is so you can restrict its CORS policy. It should only accept PUT requests from one source: your production frontend. For example, here is my production CORS policy:
<?xml version="1.0" encoding="UTF-8"?>
<CORSConfiguration xmlns="http://s3.amazonaws.com/doc/2006-03-01/">
<CORSRule>
    <AllowedOrigin>https://myfrontend.herokuapp.com</AllowedOrigin>
    <AllowedMethod>POST</AllowedMethod>
    <AllowedMethod>PUT</AllowedMethod>
    <AllowedMethod>GET</AllowedMethod>
    <AllowedHeader>*</AllowedHeader>
</CORSRule>
</CORSConfiguration>
You don’t need to enable CORS for the communication between Rails and S3, because that is not technically a request, it is Active Storage.
Heroku Production Settings
You may have to update your Heroku prod environment. After you push your code, don’t forget to heroku run rails db:migrate. You will also need to make sure your environment variables are correct. You can view them with heroku config. You can set them by going to the app’s settings in the Heroku dashboard. You can also set them with heroku config:set AWS_ACCESS_KEY_ID=xxx AWS_SECRET_ACCESS_KEY=yyy S3_BUCKET=bucket-for-app AWS_REGION=my-region-1.
Public Viewing of Files
The public URL you receive to view the files is temporary. If you want your files to be permanently publicly viewable, you will need to take a few more steps. That is outside the realm of this guide.
Some Troubleshooting
Here are some errors I ran into while building this guide. It is not comprehensive, but may help you.
Problems with server initialization: make sure the names in your .env files match the names where you access them.
Error: missing host to link to for the first request. In my case, this meant I had not put :amazon as my Active Storage source in development.rb.
StackLevelTooDeep for last request. I had this issue when calling users_controller#create because I had not removed the “resume” field from my schema. Make sure your database schema does not include the file. That should only be referenced in the model with has_one_attached.
AWS requests fail after changing CORS: make sure there are no trailing slashes in your URL within the CORS XML.
Debugging your checksum: this is a hard one. If you are getting an error from S3 saying that the computed checksum is not what they expected, this means there is something wrong with your calculation, and therefore something wrong with the Javascript you received from here. If you double check the code you copied from me and can’t find a difference, you may have to figure this out on your own. For Javascript, you can check the MD5 value by calling .toString() on it with no arguments. On the command line, you can drop the --binary flag.
Sources and References
Much of this was taken from Arely Viana’s blog post for Applaudo Studios. I linked the code together, and figured out how the frontend would look. A huge shout-out to them!
Here are some other resources I found useful:
- Heroku’s guide for S3 with Rails - this is not for Rails as an API, but it does talk about environment setup
- The code for Arely’s guide - also has some example JSON requests
- Rails Active Storage Overview
- Uploading to S3 with JS - this also uses AWS Lambda, with no backend